


Adobe Acrobat Reader 8.0 - Plugin with Controls
Adobe Reader 8 brings a Control Bar back to the Acrobat Reader Plugin, and adds a Sidebar. Under Acrobat 7, I had to save a pdf and view it with the standalone reader, in order to zoom. No longer!
Adobe Reader 8 brings a Control Bar back to the Acrobat Reader Plugin, and adds a Sidebar. Under Acrobat 7, I had to save a pdf and view it with the standalone reader, in order to zoom. No longer!
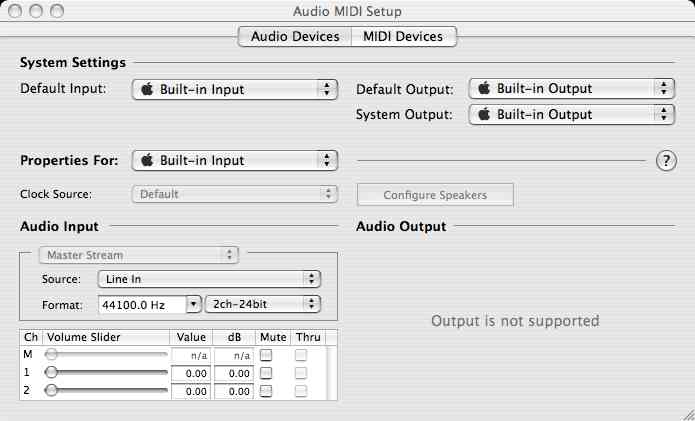
This may mean that one application has changed your computer's audio settings to a sample rate that is too high for other applications to use. The problem may appear when you try to play audio content from BBC or NBC in Real Player.
To use the Mac OS X audio drivers:
Then set audio output to 44.1kHz 2-channel 24-bit

GimmeSomeTune will get you covers from the Internet and, if you so choose, automatically add them to iTunes.
Freeware by Eternal Storms Software download from apple.
Flash Player Version 9,0,28,0 works with Safari 2.0.4 (419.3) OSX 10.4.8 on Intel MacBook Pro (Boot ROM version MBP11.0055.B03)
Flash Player Version 9.0.20.0 was incompatible with Safari 2.0.4 (419.3) OSX 10.4.7 on Intel MacBook Pro (Boot ROM version MBP11.0055.B03)
Suddenly my MacBookPro 15" doesn't think it has a battery. Energy monitor menu says, "No batteries available"!
I've tried everything that Apple recommends: restart, forced shutdown and PMU reset. No joy. The battery shows 3/5 lights; the computer runs fine on AC power, but dies if this is interrupted. This is my new replacement battery from Apple - see earlier post.
Google shows me that I'm not the only one with this problem (or similar).
Scotsys were helpful as usual. We tried swapping batteries with a demo machine. This showed that the battery had the problem (I suspect that this is a battery software problem).
In any case, I now have a battery on loan while mine is returned to Apple for replacement.
I also bought a spare power supply, as the connection between DC cable and magnetic plug on the original power supply is starting to fray.
New battery and new power brick have been working fine for a few months now. I still love my MBP!
Kerberos Login Failed:
The specified realm is not in your configuration file or does not exist
Why do I get this error message, and how can I fix the problem?
The realm is intentionally not in my configuration file. I've selected "Configure additional realms automatically using DNS" in the Settings pane of the Edit Realms dialog summoned from the Kerberos Edit menu.
Of course the realm exists. This should work - Kerberos just cant find the realm as the DNS is broken. Autoconfiguration should be achieved using using DNS TXT records [RFC 1035]. Some, not RFC compliant, DNS servers (in particular the one shipped with my SpeedTouch Alcatel 510 modem - I have an old 510v3; the problem occurs with both LEFTAA3.721 andLEFTAA3.716 firmware) can't resolve the TXT record query.
A solution is to provide explicitly the IP address of a competent DNS server (such as the one your ISP provides) in the TCP/IP pane of Network preferences. Once this is done, autoconfiguration works fine.
WDS stands for Wireless Distribution System.
WDS lets you link together a number of airport base stations (access points) to extend the coverage of your wireless network. Remote base stations connect via relay base stations back to a main base station that is connected to the internet.
I have a network with a router connected to six access points (3 Airport Extreme, 3 Airport Express) connected wirelessly to span across three floors in three adjacent houses.
           relay1 - relay2 - relay3
           /                     \
router = main                  remote1
           \
           remote2
The connection between router and main base station is a wire (ethernet cable in my case, but could be USB); the other connections are wireless. You have to configure each access point correctly to make this work. Each base station will eventually be configured with the ID of the base station which links it back to the root and the IDs of the base stations it serves.
Setting this up is a pain, since if something gets messed up you may have to reconfigure each and every access point from scratch— here's how to get it right first time.
The basic idea is to view the network as a tree, and to build the network step-by-step from the router (the root of the tree) to the remote base stations (the leaves of the tree). We first set up the root (main base station), then add leaves (remote base stations) directly connected to the root, then extend the tree by converting these leaves to branches (relay base stations) and adding new leaves.
Should you later want to change the channel your network uses, you can do this without rebuilding the entire configuration, by changing the channel used by the leaves first, and then working your way back up the tree until finally you change the channel used by the root. You can do this using the wireless connectivity - but until you finish, the base stations you have already changed will be inaccessible.
Make sure you have the latest Software Updates installed - preferably on a laptop. Equip yourself with a spare ethernet cable. Label each access point with its name and airport ID (use a PostIt note). Keep a list of the names and airport IDs, and draw a diagram showing how you plan to connect your network.
Connect your main base station to your ADSL router or cable modem, and power it on. Launch Airport Admin Utility and configure this base station.
Choose a base station that will be connected directly to the root base station. Connect this to your laptop using ethernet. make sure that both the root base station and this new leaf are visible in Airport Admin Utility. Select the root base station and click "Configure".
You should now be able to unplug the ethernet connection and see both base stations in Airport Admin Utility via wireless alone.
If you look at the Internet configuration of your newly remote base station, you will see that it is set up to connect using Airport (WDS), using the main base station as WDS host.
To add more links at this level, attach futher base stations by ethernet, configure the main base station, and add the new base station as a remote client, just as in the final steps above.
We now convert leaves to branches and add new leaves
Choose a base station that will become the new leaf. Connect this to your laptop using ethernet. make sure that both the old leaf you want to change into a branch and this new leaf are visible in Airport Admin Utility. Select the old leaf and click "Configure".
If you look at the Internet configuration of your newly remote base station, you will see that it is set up to connect using Airport (WDS), using the relay base station as WDS host. This works.
Ignore the instruction, "The MAC address entered above should be the MAC address of the primary WDS base station, that is the base station connected to the internet."
Again, you can add more leaves to an existing branch by adding new clients to the relay base station.
I have one of the faulty MBP batteries
My MBP was working fine; 3h - 4h battery life. Now I get 20 mins, then darkness.
Suddenly, after 20 minutes from fully charged, MBP dies —no warning, no shutdown, just STOP! Battery still has 4 lights, try restart; dies again within seconds of starting. Battery now only 1 light flashing.
I can operate on AC and battery appears to charge, but running on battery reproduces the symptoms above.
Tried resetting the PRAM, tried restting the PMU; no change
Others have the same problem.
Working on AC — planning trip to Apple dealer.
First we verified that the battery was the problem — we swapped the batteries of their demo machine and my MBP (both registring "charged"; took the machines off AC, set them both to work (iTunes visualizer, no volume, no sleep); waited for their machine (with my battery) to die, which it did after 10 minutes or so.
They didn't have a stock of batteries. You don't plan to stock replacement batteries in the first years of a product line.
So they loaned me the battery from the demo model while the dud was returned to Apple for replacement.
The demo model is running on AC, without the battery.
The first replacement Scotsys got was damaged in transit, so I kept their battery until a replacement for that arrived. All went well for a few weeks, then a new disaster!
This note assumes you have a working Fink installation of tetex on your Mac.
To install the local latex classes, such as infletr, which produces letters on informatics letterheads (School, Institutes, Graduate School, ITO, etc.):
In a terminal window on your mac, do (don't type the % that is supposed to represent the shell prompt)
% cd /sw/etc/texmf.local/tex/
then the following
% sudo scp -r user@host.inf.ed.ac.uk:/usr/local/share/texmf/tex/latex .
Here user is your UUN, host is any dice machine you have access to. You will get asked for your mac password (for the sudo) and then, unless you have a valid Kerberos ticket, your dice password (for the scp access to your dice machine).
Then let the latex installation cache information about the classes you've installed.
% sudo texhash
Fink doesn't interfere with texmf.local, so you can use Fink to update your latex installation without destroying your copy of the informatics classes — but you should use rsync from time-to time to keep your copy up-to-date.
% sudo rsync -az --delete user@host.inf.ed.ac.uk:/usr/local/share/texmf/tex/latex /sw/etc/texmf.local/tex/latex
% sudo texhash
\pi^2 =&6\sum_{i=0}^{\infty}\frac{1}{i^2}\\
\pi^4 =&90\sum_{j=0}^{\infty}\frac{1}{j^4}\\
\pi^6 =&960\sum_{k=0}^{\infty}\frac{1}{k^6}

This small app from Pierre Chatelier allows you to create JPG and PDF images for inclusion in your web pages, easily from LATEX math. Here you see a jpg — click the image to see the pdf.
When you generate a pdf file, LATEX iT embeds the LATEX source in the pdf, so that,later, you can paste the pdf back into this application, and edit the source. Brilliant!
The latest Universal Binary Flash Plugin (9,0,28,0) now works in Safari 2.0.4 (419.3) — see Flash Player Update
A Universal Binary Flash Plugin is available, but Shockwave is still PPC only. Solution: run Safari in Rosetta.
Download the latest version! (as of 20060910: 9.0 r20 for Intel; 9.0 r16 for PPC)
This System Management Controller firmware update (unlike the one below) is offered via Software Update; now I really do think my MacBookPro is running cooler. This firmware and the SMC are invisible to About this Mac — the Boot ROM version remains the same as below.
Check your firmware version:
Apple Menu >> About this Mac >> More Info
The MacBook Pro Firmware Updater installs Boot ROM Version: MBP11.0055.B03
If your version is lower, follow the instructions!
I found this while reading Apple Discussions about overheating issues for MBP. The case around the area below the ESC key sometimes now feels cooler (I think - need temperature monitor).
Summary: It works for me!
The newsflash is discouraging:
A preliminary version of Fink for the Intel architecture is now ready. No binary packages are available, and things are still rough around the edges, but it should be usable if you are patient!
but gives the following instructions:
To install it, you need to install the XCode compiler and SDK packages (at minimum). Then you need to get the file
fink-0.24.14.tar.gz from the
Sourceforge file release page for Fink, expand the file, and run the command ./bootstrap.sh
At the end of the bootstrap process, run fink selfupdate
and you'll get the currently available packages.
I tried it and it works! The Intel Mac is fast enough that installing everything from source doesn't take forever.
I then downloaded the 0.5.4 version of the Fink Commander binary from SourceForge - this works.
You can also download the source using CVS:
First login anonymously (this is a single instruction, and should be given on a single line, just copy the whole instruction, and paste into the terminal - when challenged for password, hit return):
cvs -d:pserver:anonymous@finkcommander.cvs.sourceforge.net:/cvsroot/finkcommander login
Then checkout the whole tree (another single instruction - this will create a directory namd FinkCommander):
cvs -z3 -d:pserver:anonymous@finkcommander.cvs.sourceforge.net:/cvsroot/finkcommander co -P .
open FinkCommander/FinkCommander.xcodeproj - this should launch XCode.
In the Project menu, Set Active Build Configuration to Deployment; in the Build menu select Build. Wait a short while and voila - your own universal 0.5.4 binary! Find FinkCommander.app and move it into your Applications folder. Make sure you tick use unstable packages under the Fink tab of FinkCommander preferences.
I use Fink primarily to install the latest emacs (emacs21) and LATEX (tetex), but also for other goodies such as unison (which now does doesn't yet build on Intel) and bibtex2html.
You want to use Shark to profile your java code - and you want an ant target that runs your jar file under Shark. You have to call the jvm with the option -XrunShark
Create a new target in your build.xml file
<target name="profile" depends="jar"
        description="Run jar file (no args) with Shark profiler">
     <java jar="${jarfile}" fork="yes" failonerror="true">
         <jvmarg value="-XrunShark"/>
     </java>
</target>
Start Shark, then run
ant profile
Shark is a profiling tool included in the CHUD package. CHUD is an optional install which comes with XCode Tools. The CHUD installer is in the Packages folder, and installs Shark in /Developer/Applications/Performance Tools
Unison, courtesy of Benjamin Pierce is a file-synchronization tool for Unix and Windows. It allows two replicas of a collection of files and directories to be stored on different hosts (or different disks on the same host), modified separately, and then brought up to date by propagating the changes in each replica to the other.
I have Unison installed using FinkCommander (see my blogitem on Intel port of Fink) - as a by-product this also gives you an installation of ocaml. Unison is an "unstable" packackage installed from source, so to install it you first need to install Apples's XCode and X11 SDK (from the Tiger installation disks) to provide the compilers, headers etc neded to build the application. Then in Fink Commander Preferences select "Use unstable packages" (Fink tab). From the menus run Source>SelfUpdate then Source>UpdateAll. Finally, select the unison package then install from source (click the .h icon).
To use unison to synchronise your mac with your DICE files, run unison from the command-line in an X terminal window using the staff.ssh.inf.ed.ac.uk server. The DICE unison installation may not be the latest, so use 'unison-[version]' to run a matching version on the Mac. (eg unison-2.10.2). Current DICE version is 2.12.0 - this is not included in the Fink package.
Shuly Wintner provides a variety of binary versions with native Mac UI. Get the 2.12.0 version, to match the unison server on DICE - it appears to run fine under rosetta.
Real Player Universal Binary is now available - build 412.
Note that this version is not mirrored on all download sites (the London UK site hosted by demon still has build 352, PPC only). I used one of the Seattle sites to get 412. You can check which build you have downloaded using get Info (command-I).
Once you've downloaded the correct build and put the put it into your applications folder, quit all web browsers; open the RealPlayer application, go through the setup process, which will install the plugin needed to access RealPlayer content on the web, such as BBC Radio Player.
You can then change Safari to run native — unless you want to view Shockwave content!
In the finder use get Info (command-I) then click "Open using Rosetta".
Since the RealPlayer plugin is compiled to PPC code you have to ensure Safar is run under Rosetta - an application running native Intel code cannot use a PPC plugin.
BBC Radio Player uses RealPlayer, so you need the same trick to run BBC Radio player on an Intel Mac.
Since the DivX plugin is compiled to PPC code you have to ensure Quicktime or Safari run under Rosetta - in the finder use get Info (command-I) then click "Open using Rosetta".
Update 2006:04:12 The plugin provided by the official release of DivX Player for Macintosh is a Universal binary. You can run it native. Curiosly, the DivX Converter and DivX Player are still PPC.
Download the DivX 6 for Mac Installer.pkg
Double-click the installer to install the codec. Restart, and use Quicktime Player or Safari, to watch the latest day's work on the building (around 1.5Mb). You can also see the day at a slower pace (around 170Mb) or a directory of other views.
