Bookmark this site!

2007-08-28

pdftk doesn't rotate pdfs

pdftk - A handy tool for manipulating PDF

Highly recommended: I use it for concatenating pdf documents, or selecting a subset of pages. I get it via fink, but you can also find it online. Unfortunately, pdftk doesn't allow you to rotate pages.

Preview.app lets you rotate and save pdfs: ⌘-L, ⌘-R, or use the menu—to rotate a single page, hold the option (alt) key while doing this.

2007-08-18

Skype Out? Use Gizmo or Jajah!

Error in Skype’s Software Shuts Down Phone Service

Never mind!

Gizmo works just like Skype—free calls to other Gizmo users, cheap calls to landlines and mobiles worldwide. Unlike Skype it uses open standards (SIP), so it is compatible with other VoIP tools, such as Asterisk.

Jajah uses a different model—cheap or free calls between landlines or mobiles worldwide, set up from the internet. You can set calls up from any browser, or your symbian phone can set up the call via a GPRS/EDGE data connection or SMS message, giving cheap calls from your mobile to POTS numbers worldwide.

In any case, Skype may cost more than you bargained for.

2007-07-17

dependent dylib is not prebound

Is your Mac sluggish and running slow?

Are your Office apps refusing to run?

Your automated prebinding updates may be failing.

Run the command
sudo update_prebinding -debug -root / -force
If you get the following error:

dyld: re-prebound: 0x90bee000 /usr/lib/libgcc_s.1.dylib
update_prebinding: error: dependent dylib is not prebound
update_prebinding: error 256 running update_prebinding_core
then edit the update-prebinding-paths file (this has the list of files to prebind: the one that fails is immediately after the last one to succeed)
sudo emacs /var/db/dyld/update-prebinding-paths.txt
Search for libgcc_s.1.dylib, and comment out the next line (by adding the #) so it reads
#/Applications/Utilities/Java/Java Web \ Start.app/Contents/Resources/Java/libmacjavaws.jnilib
Save the file, then try updating the prebindings again. For me, the next (and final) failure was after libjsound.jnilib. So I comment out the following line
#/System/Library/Frameworks/\
JavaVM.framework/Versions/1.3.1/Libraries/librealawt.jnilib
On the next try everything else went through. My Powerbook is much snappier.

It seems that you may need to reinstall Flash Player after doing this. Try the Adobe Shockwave and Flash player test to check. First uninstall previous versions. Shockwave will still only work if you run your browser under Rosetta. Flash is Universal

2007-07-14

Repairing your laptop startup disk

The easiest way is to find another Mac running OSX. Restart your laptop in Target Disk Mode (either via system preferences, or hold the T key down while restarting). Connect the two machines by firewire, and run Disk Utility on the other Mac.

Repairing the disk may take some time - so don't rely on battery operation, connect to mains power.

Repairing the disk may fail, so backup a copy of crucial files before starting the repair.

Microsoft Office 2004 broken: dead as a parrot

Quicktime 7.2 update breaks Office 2004 on Intel Powerbook

For solution, see below

If you haven't yet installed QT7.2, my advice is to wait!

Here's what happened to me:

  • Office Update 11.3.6 refuses to launch.
  • MS Word refuses to launch!
  • MS Powerpoint refuses to launch.
  • MS Excel refuses to launch.
  • decide to remove Office, and reinstall!
  • MS Office refuses to install—the installer won't run.
  • Remove all traces of Office in preferences etc.!
  • MS office installer won't run.
  • !

macfixit has some suggestions these didn't work for me.

It seems that the prebinding of the java libraries is at fault!

Steps to Fix:

Remove Java 6

> su Administrator
> cd /Library/Receipts/JavaSE6Release1.pkg/Contents
> lsbom -s -f Archive.bom > /tmp/file-list
Edit /tmp/file-list to replace all " " with "\ " and all "./" with "rm /" (I use emacs for this.)

> sudo bash /tmp/file-list
> rm -r /Library/receipts/JavaSE6Release1.pkg
> sudo update_prebinding

I removed the following

sudo rm -r /Library/Receipts/JavaForMacOSX10.4Release5.pkg
and installed it again. (From http://developer.apple.com/java/download/)

2007-07-04

802.11n

The following Macs have the 802.11n hardware built-in:

  • * MacBook Pro with Intel Core 2 Duo
  • * MacBook with Intel Core 2 Duo
  • * Mac Pro with AirPort Extreme option
  • * iMac with Intel Core 2 Duo (except the 17-inch, 1.83GHz iMac)

However, you will have to upgrade the firmware.

The CD that comes with your new airport extreme base station contains the AirPort Extreme 802.11n enabler, which updates the firmware on your airport card to enable 802.11n high-speed WiFi:

  • 74 - 248 Mbit/s
  • 70 - 160 metres range

If you buy a third-party 802.11n base station, you can get the enabler from the Apple store for $1.99

Zip it up

To zip a directory:
Select the folder in the Finder.
From the File menu, select Create Archive of "<foldername>"
that's all!
Leopard update:
In Leopard the menu entry reads Compress "<foldername>"

You have created a zip archive <foldername>.zip

To unzip, double-click the file <foldername>.zip

2007-05-23

MacBookPro with Cinema Display - Sleep and Wake

I have an Intel MacBook Pro.

In my office I have a 30" Cinema Display, wireless keyboard and USB mouse (attached to the display). I have a spare power block next to the display.

In theory I should just arrive, switch on the keyboard, plug everything in to the MacBook(video, usb and firewire connections from the display, power and ethernet from the wall), and go!

In practice, sometimes it worked, and sometimes the MacBook would refuse to talk to the display. Worse still, it would refuse to wake up if I disconnected everything, and tried to run stand-alone. Until I found the secret, I had to force a reboot with the power key.

The secret is, connect the power first!

Connect the power, plug in video, usb, firewire, ethernet. The computer wakes and the display comes to life. Turn on the keyboard, type a few characters (type them somewhere non-critical). A couple of characters may get lost initially, but once the connection is established, everything is fine.

2007-05-22

Airport Extreme WDS daisy chain

I've added two airport extreme 802.11n base stations to my WDS network. Mostly this was straightforward. The basic procedure is just as described earlier for the previous Airport models. The UI of the new Airport Utility app is clearer than the previous version.

However, I found the two Airport Extreme base stations got confused when I used DHCP to link them into the network. Instead, I've given them manually assigned IP addresses - in the same 10.0.0.xxx range as I use for DHCP. My Alcatel Speedtouch DSL modem acts as a DHCP server, and I've set it to distribute addresses above 10.0.0.16 — which leaves me plenty of addresses below this to allocate manually.

The network is now something like this (with some base stations running the full range of protocols, 802.11b,g,n, and othersonly one of these, as shown):


     airport(b)  express(g) = speakers
            \    /
    disk = extreme(b,g,n) - airport(g) - express(g)
           /                                 \         
       = extreme(b,g,n) = printer          express(g) = speakers
      |       
router     
      |
       = airport(b,g)

Here, "airport" means an old conical airport extreme; express is the small block airtunes gizmo; extreme is the new 802.11n-capable mini-sized device.

To insert a new base station into my existing network, I first set its MAC address (aka airport ID) as the WDS main value for each of its children; then I configured the new base station with the children's MAC addresses in the WDS remotes list.

To configure the new devices I found it easiest to switch off the other base stations, and connect wirelessly to the new device. If you click on the name of a setting shown under the Summary tab, you are taken directly to the tab where you can edit the value. You want Wireless Mode: Participate in a WDS network. You should also set the Channel: and Network Name: to match the other base stations. Then you can set IP Address:. (As described above, DHCP confuses my two new Express base stations, so I set Configure IPv4: Manually. You can find the subnet mask and router address from the configuration of another base station. You may want to try Configure IPv4: Use DHCP first, as this is simpler.) For WDS relay and remotes you want Connection Sharing: Off (Bridge Mode). This is also correct for the WDS root if your modem acts as a DHCP server; otherwise you may need the WDS root to act as DHCP server (Distribute a range of IP addresses).

2007-03-22

OSX Alarm Clock

Stuck away from home with a dead mobile phone battery, I needed an alarm clock—no sign of it in Date and Time.

The solution: use iCal on the MacBook. Set an event at the time you want the alarm. Set up an alarm action to open a suitably noisy audio file (which will open with iTunes if you have the default setup).

Make sure you set the alarm to go off on date (not 15 minutes beforehand as I first did). Make sure the volume is set high, headphones removed. Leave the lid open and, preferably, power connected. The alarm will wake the laptop from sleep, and play your song.

Update 2009-02-15 In Leopard 10.5.6 the alarm does not wake your computer from sleep :-( In System Preferences >> Energy Saver >> Schedule, set your computer to wake a couple of minutes before the alarm goes off.

If you subscribe to any external calendars, set iCal offline — otherwise any alerts complaining that some calendar is unreachable will prevent the alarm from sounding.

2007-03-06

Live video from an iSight camera

How can you use your iSight camera without iChat? You can capture live video from your iSight camera directly into iMovie HD.

You must have iChat AV on your computer. If you have a stand-alone iSight camera, turn it on by opening the privacy shutter.

  • If iChat AV launches automagically, quit it.
  • Start iMovie HD.
  • Click the mode switch to set iMovie HD to camera mode.
  • Click the camera icon to the left of the mode switch and choose iSight or Built-in iSight from the pop-up menu—you also have the option to make a time-lapse recording.
  • Click the Record With iSight button at the bottom of the iMovie monitor.
  • The video you see in the iMovie monitor is recorded as a clip in the Clips pane.
  • Click Record With iSight again to stop recording.

For still photography with iSight, use Photo Booth.

2007-02-24

Missing Google Spreadsheets

I've recently started using Google Apps for various collaborative tasks. These are great!

5 March 2007: Panic over—spreadsheets returned a few days ago!

But a few days ago, all my spreadsheets disappeared; replaced by the following message.

Sorry! We are experiencing technical difficulties and can only show word processing documents. Try again

I've now found the relevant help article. The third suggestion works for me: get into spreadsheets by creating a new spreadsheet, then use File>Open... from the menus.

My spreadsheets are missing. What do I do?

If you're having problems finding your spreadsheets, these suggestions might help:

- Make sure that you are logged in to Google Docs & Spreadsheets with the address you formerly used to sign in to Google Spreadsheets. Although you may be able to sign in to Google Docs & Spreadsheets with other Google Accounts, only the email/password combo formerly associated with Google Spreadsheets will allow you access to your spreadsheets.

- Near the top right corner of the active documents and spreadsheets page, click on "Browse Docs & Spreadsheets," then click on "All." This will show every document and spreadsheet associated with the account you're signed in with.

- If you're still unable to find your spreadsheets, click on the "New Spreadsheets" link from the document and spreadsheets list page. Once this opens, click on "File" > "Open." If listed, you can access your missing spreadsheets from this menu.

- If you have used the "move old documents" feature, and are missing your spreadsheets after this move, log in to the account from which these documents were moved. You should see your spreadsheets in this account. From here, you can add your new account as a collaborator on each of the spreadsheets, and consolidate your documents and spreadsheets in this way."

If none of these suggestions help you find and access your spreadsheets, please contact us so that we can investigate the situation further.

2007-01-28

LATEX Equation Editor

La TeX Equation Editor
LaTeXit
In an earlier post I mentioned LATEXiT, by Pierre Chatelier. The LATEX Equation Editor is similar in function—and not entirely dissimilar in appearance.
I'm not sure yet which I prefer. Both are free—try both. If you already downloaded LATEXiT last year, make sure you try the latest version.
If you have a Fink tetex installation, you must set the preferences for LATEX Equation Editor to specify that LATEX is in /sw/bin/ and ghostscript in /sw/share.
LaTeX Equation Editor prefences See also mimetex and LATEX render.

iRecordMusic-record streaming audio as mp3 or mp4 (AAC)

Supports broadcasts in RealAudio and WindowsMedia, the preferred audio formats of many radio stations. Records to a variety of formats. This US$25 program lets you record clips from BBC Radio Player. Free demo version limits recordings to 15 minutes maximum. Radiotastic is a Dashboard widget for listening live and real-time recording of Internet audio.

2006-12-14

Adobe Acrobat Reader 8.0 - Plugin with Controls

Acrobat ToolbarAcrobat Sidebar 
Adobe Reader 8 brings a Control Bar back to the Acrobat Reader Plugin, and adds a Sidebar. Under Acrobat 7, I had to save a pdf and view it with the standalone reader, in order to zoom. No longer!
Download Acrobat Reader

2006-11-10

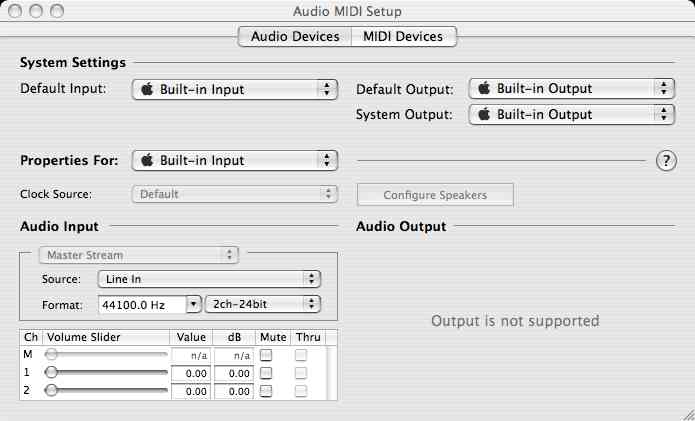
My audio applications have stopped working

Audio device may be in use by another application

Mac OS X: No audio from certain multimedia content

This may mean that one application has changed your computer's audio settings to a sample rate that is too high for other applications to use. The problem may appear when you try to play audio content from BBC or NBC in Real Player.

Apple suggests:

To use the Mac OS X audio drivers:

  1. Open Audio MIDI Setup and click the Audio Devices tab.
  2. Choose Default Output: Built-in Output and System Output: Built-in Output from the pop-up menus.

Then set audio output to 44.1kHz 2-channel 24-bit

  1. Under Properties for: select Built-in Output.
  2. Set the Audio Output Format to 44100.0 Hz. 2ch-24bit
  3. Quit Audio MIDI Setup.

What if it says output is not supported?


Under Properties for: choose Built-in Output

GimmeSomeTune

Get album artwork automatically, as you play your music.

GimmeSomeTune will get you covers from the Internet and, if you so choose, automatically add them to iTunes.

Freeware by Eternal Storms Software download from apple.

2006-09-24

Flash Player Update

Flash Player Universal Binary no longer works with Safari - fine with Camino

Flash Player Version 9,0,28,0 works with Safari 2.0.4 (419.3) OSX 10.4.8 on Intel MacBook Pro (Boot ROM version MBP11.0055.B03)

Flash Player Version 9.0.20.0 was incompatible with Safari 2.0.4 (419.3) OSX 10.4.7 on Intel MacBook Pro (Boot ROM version MBP11.0055.B03)

2006-08-14

Battery AWOL

Suddenly my MacBookPro 15" doesn't think it has a battery. Energy monitor menu says, "No batteries available"!

I've tried everything that Apple recommends: restart, forced shutdown and PMU reset. No joy. The battery shows 3/5 lights; the computer runs fine on AC power, but dies if this is interrupted. This is my new replacement battery from Apple - see earlier post.

Google shows me that I'm not the only one with this problem (or similar).

Scotsys were helpful as usual. We tried swapping batteries with a demo machine. This showed that the battery had the problem (I suspect that this is a battery software problem).

In any case, I now have a battery on loan while mine is returned to Apple for replacement.

I also bought a spare power supply, as the connection between DC cable and magnetic plug on the original power supply is starting to fray.

Update

New battery and new power brick have been working fine for a few months now. I still love my MBP!

2006-07-09

Kerberos Login Failed

Kerberos Login Failed:
The specified realm is not in your configuration file or does not exist

Why do I get this error message, and how can I fix the problem?

The realm is intentionally not in my configuration file. I've selected "Configure additional realms automatically using DNS" in the Settings pane of the Edit Realms dialog summoned from the Kerberos Edit menu.

Of course the realm exists. This should work - Kerberos just cant find the realm as the DNS is broken. Autoconfiguration should be achieved using using DNS TXT records [RFC 1035]. Some, not RFC compliant, DNS servers (in particular the one shipped with my SpeedTouch Alcatel 510 modem - I have an old 510v3; the problem occurs with both LEFTAA3.721 andLEFTAA3.716 firmware) can't resolve the TXT record query.

A solution is to provide explicitly the IP address of a competent DNS server (such as the one your ISP provides) in the TCP/IP pane of Network preferences. Once this is done, autoconfiguration works fine.

2006-07-02

Airport WDS daisy-chain

Update: see also Airport Extreme WDS daisy-chain

WDS stands for Wireless Distribution System.

WDS lets you link together a number of airport base stations (access points) to extend the coverage of your wireless network. Remote base stations connect via relay base stations back to a main base station that is connected to the internet.

I have a network with a router connected to six access points (3 Airport Extreme, 3 Airport Express) connected wirelessly to span across three floors in three adjacent houses.


           relay1 - relay2 - relay3
           /                     \         
router = main                  remote1
           \      
           remote2

The connection between router and main base station is a wire (ethernet cable in my case, but could be USB); the other connections are wireless. You have to configure each access point correctly to make this work. Each base station will eventually be configured with the ID of the base station which links it back to the root and the IDs of the base stations it serves.

Setting this up is a pain, since if something gets messed up you may have to reconfigure each and every access point from scratch— here's how to get it right first time.

The basic idea is to view the network as a tree, and to build the network step-by-step from the router (the root of the tree) to the remote base stations (the leaves of the tree). We first set up the root (main base station), then add leaves (remote base stations) directly connected to the root, then extend the tree by converting these leaves to branches (relay base stations) and adding new leaves.

Should you later want to change the channel your network uses, you can do this without rebuilding the entire configuration, by changing the channel used by the leaves first, and then working your way back up the tree until finally you change the channel used by the root. You can do this using the wireless connectivity - but until you finish, the base stations you have already changed will be inaccessible.

Plan First

How do you connect to the internet?
I have an ADSL router (Speedtouch 150) set up as a DHCP server. Each client machine uses DHCP to connect; each access point acts a bridge (uncheck "Distribute IP addresses" in the Network pane).
Where will the base stations be sited?
The main base station is wired to the router. Each access point must be linked back to the main base station by a single "daisy chain" of wireless hops. Choose your locations and plan your links so that the wireless signal can easily make each hop.
Each access point can also link to wireless clients. Make sure that together they provide the coverage you need.
What wireless service will your network provide?
  • 802.11b/802.11g? You can mix and match here. I have the main AP providing 11b+11g to support a legacy macine with 802.11b airport card, and the rest on pure 11g.
  • Which channel will you use? All your access points must use the same channel. Sniff out what your neighbours are doing and try to leave two channels clear between you and them. iStumbler is the tool I use, also get the Spectrum widget from the same place.
  • What security do you need? The security setup (WEP/WPA + number of bits + password) must be the same for every AP
What is the name of your wireless network?
You will also need to choose a name for each access point.

Prepare (base step, setting up the root)

Make sure you have the latest Software Updates installed - preferably on a laptop. Equip yourself with a spare ethernet cable. Label each access point with its name and airport ID (use a PostIt note). Keep a list of the names and airport IDs, and draw a diagram showing how you plan to connect your network.

Connect your main base station to your ADSL router or cable modem, and power it on. Launch Airport Admin Utility and configure this base station.

Airport tab
Set the base station name. set the network name, channel, mode, security.
Internet tab
Connect using Ethernet; Configure using DHCP. I use the base station name as DHCP client ID
Network tab
If your router acts as DHCP server, uncheck "Distribute IP addresses".
WDS tab
For the time being, leave "Enable this base station as a WDS" unchecked.
Update

Make sure you can connect to your ISP using DHCP.

Set up WDS main base station (creating the first leaves)

Choose a base station that will be connected directly to the root base station. Connect this to your laptop using ethernet. make sure that both the root base station and this new leaf are visible in Airport Admin Utility. Select the root base station and click "Configure".

WDS tab
Check "Enable this base station as a WDS main base station".
Click (+) and add the new base station as a WDS remote base station (client).
Update
Let the Admin Utility configure the remote base station automatically.

You should now be able to unplug the ethernet connection and see both base stations in Airport Admin Utility via wireless alone.

If you look at the Internet configuration of your newly remote base station, you will see that it is set up to connect using Airport (WDS), using the main base station as WDS host.

To add more links at this level, attach futher base stations by ethernet, configure the main base station, and add the new base station as a remote client, just as in the final steps above.

Set up WDS relay base stations (creating the first branches)

We now convert leaves to branches and add new leaves

Choose a base station that will become the new leaf. Connect this to your laptop using ethernet. make sure that both the old leaf you want to change into a branch and this new leaf are visible in Airport Admin Utility. Select the old leaf and click "Configure".

WDS tab
Under "Enable this base station as a WDS" select "relay base station".
Click (+) and add the new base station as a WDS remote base station (client).
Update
Let the Admin Utility configure the remote base station automatically.

If you look at the Internet configuration of your newly remote base station, you will see that it is set up to connect using Airport (WDS), using the relay base station as WDS host. This works.
Ignore the instruction, "The MAC address entered above should be the MAC address of the primary WDS base station, that is the base station connected to the internet."

Again, you can add more leaves to an existing branch by adding new clients to the relay base station.

References

AirPort: Potential sources of interference

2006-06-17

Battery Fault MacBook Pro

Summary

I have one of the faulty MBP batteries

Symptoms

My MBP was working fine; 3h - 4h battery life. Now I get 20 mins, then darkness.

Suddenly, after 20 minutes from fully charged, MBP dies —no warning, no shutdown, just STOP! Battery still has 4 lights, try restart; dies again within seconds of starting. Battery now only 1 light flashing.

I can operate on AC and battery appears to charge, but running on battery reproduces the symptoms above.

Tried resetting the PRAM, tried restting the PMU; no change

Others have the same problem.

Working on AC — planning trip to Apple dealer.

Update Scotsys are great!

First we verified that the battery was the problem — we swapped the batteries of their demo machine and my MBP (both registring "charged"; took the machines off AC, set them both to work (iTunes visualizer, no volume, no sleep); waited for their machine (with my battery) to die, which it did after 10 minutes or so.

They didn't have a stock of batteries. You don't plan to stock replacement batteries in the first years of a product line.

So they loaned me the battery from the demo model while the dud was returned to Apple for replacement.

The demo model is running on AC, without the battery.

Update

The first replacement Scotsys got was damaged in transit, so I kept their battery until a replacement for that arrived. All went well for a few weeks, then a new disaster!

2006-06-04

texmf.local for Fink-installed latex

This note assumes you have a working Fink installation of tetex on your Mac.

To install the local latex classes, such as infletr, which produces letters on informatics letterheads (School, Institutes, Graduate School, ITO, etc.):

In a terminal window on your mac, do (don't type the % that is supposed to represent the shell prompt)
% cd /sw/etc/texmf.local/tex/
then the following
% sudo scp -r user@host.inf.ed.ac.uk:/usr/local/share/texmf/tex/latex .
Here user is your UUN, host is any dice machine you have access to. You will get asked for your mac password (for the sudo) and then, unless you have a valid Kerberos ticket, your dice password (for the scp access to your dice machine).
Then let the latex installation cache information about the classes you've installed.
% sudo texhash

Fink doesn't interfere with texmf.local, so you can use Fink to update your latex installation without destroying your copy of the informatics classes — but you should use rsync from time-to time to keep your copy up-to-date.

% sudo rsync -az --delete user@host.inf.ed.ac.uk:/usr/local/share/texmf/tex/latex /sw/etc/texmf.local/tex/latex
% sudo texhash

2006-06-03

LATEX iT


\pi^2 =&6\sum_{i=0}^{\infty}\frac{1}{i^2}\\
\pi^4 =&90\sum_{j=0}^{\infty}\frac{1}{j^4}\\
\pi^6 =&960\sum_{k=0}^{\infty}\frac{1}{k^6}
Series expansions for pi

This small app from Pierre Chatelier allows you to create JPG and PDF images for inclusion in your web pages, easily from LATEX math. Here you see a jpg — click the image to see the pdf.

When you generate a pdf file, LATEX iT embeds the LATEX source in the pdf, so that,later, you can paste the pdf back into this application, and edit the source. Brilliant!

2006-05-19

Shockwave & Flash for Intel Mac

The latest Universal Binary Flash Plugin (9,0,28,0) now works in Safari 2.0.4 (419.3) — see Flash Player Update

A Universal Binary Flash Plugin is available, but Shockwave is still PPC only. Solution: run Safari in Rosetta.

Download the latest version! (as of 20060910: 9.0 r20 for Intel; 9.0 r16 for PPC)

2006-05-05

MacBookPro Temperature Firmware

Battery Fault

SMC Firmware Update

This System Management Controller firmware update (unlike the one below) is offered via Software Update; now I really do think my MacBookPro is running cooler. This firmware and the SMC are invisible to About this Mac — the Boot ROM version remains the same as below.

Intel Mac (early 2006) Firmware Update 1.0.1 2006-04-17

Check your firmware version:
Apple Menu >> About this Mac >> More Info
The MacBook Pro Firmware Updater installs Boot ROM Version: MBP11.0055.B03
If your version is lower, follow the instructions!

I found this while reading Apple Discussions about overheating issues for MBP. The case around the area below the ESC key sometimes now feels cooler (I think - need temperature monitor).

2006-04-30

Fink on Intel Macs

Summary: It works for me!

The newsflash is discouraging:

A preliminary version of Fink for the Intel architecture is now ready. No binary packages are available, and things are still rough around the edges, but it should be usable if you are patient!

but gives the following instructions:

To install it, you need to install the XCode compiler and SDK packages (at minimum). Then you need to get the file fink-0.24.14.tar.gz from the Sourceforge file release page for Fink, expand the file, and run the command
./bootstrap.sh
At the end of the bootstrap process, run
fink selfupdate
and you'll get the currently available packages.

I tried it and it works! The Intel Mac is fast enough that installing everything from source doesn't take forever.

I then downloaded the 0.5.4 version of the Fink Commander binary from SourceForge - this works.

You can also download the source using CVS:

First login anonymously (this is a single instruction, and should be given on a single line, just copy the whole instruction, and paste into the terminal - when challenged for password, hit return):
cvs -d:pserver:anonymous@finkcommander.cvs.sourceforge.net:/cvsroot/finkcommander login
Then checkout the whole tree (another single instruction - this will create a directory namd FinkCommander):
cvs -z3 -d:pserver:anonymous@finkcommander.cvs.sourceforge.net:/cvsroot/finkcommander co -P .
open FinkCommander/FinkCommander.xcodeproj - this should launch XCode.

In the Project menu, Set Active Build Configuration to Deployment; in the Build menu select Build. Wait a short while and voila - your own universal 0.5.4 binary! Find FinkCommander.app and move it into your Applications folder. Make sure you tick use unstable packages under the Fink tab of FinkCommander preferences.

I use Fink primarily to install the latest emacs (emacs21) and LATEX (tetex), but also for other goodies such as unison (which now does doesn't yet build on Intel) and bibtex2html.

2006-03-23

ant java Shark: XrunShark

You want to use Shark to profile your java code - and you want an ant target that runs your jar file under Shark. You have to call the jvm with the option -XrunShark

Create a new target in your build.xml file

<target name="profile" depends="jar"
        description="Run jar file (no args) with Shark profiler">
     <java jar="${jarfile}" fork="yes" failonerror="true">
         <jvmarg value="-XrunShark"/>
     </java>
</target>

Start Shark, then run
ant profile

Shark is a profiling tool included in the CHUD package. CHUD is an optional install which comes with XCode Tools. The CHUD installer is in the Packages folder, and installs Shark in /Developer/Applications/Performance Tools

2006-03-22

Unison

Unison, courtesy of Benjamin Pierce is a file-synchronization tool for Unix and Windows. It allows two replicas of a collection of files and directories to be stored on different hosts (or different disks on the same host), modified separately, and then brought up to date by propagating the changes in each replica to the other.

I have Unison installed using FinkCommander (see my blogitem on Intel port of Fink) - as a by-product this also gives you an installation of ocaml. Unison is an "unstable" packackage installed from source, so to install it you first need to install Apples's XCode and X11 SDK (from the Tiger installation disks) to provide the compilers, headers etc neded to build the application. Then in Fink Commander Preferences select "Use unstable packages" (Fink tab). From the menus run Source>SelfUpdate then Source>UpdateAll. Finally, select the unison package then install from source (click the .h icon).

To use unison to synchronise your mac with your DICE files, run unison from the command-line in an X terminal window using the staff.ssh.inf.ed.ac.uk server. The DICE unison installation may not be the latest, so use 'unison-[version]' to run a matching version on the Mac. (eg unison-2.10.2). Current DICE version is 2.12.0 - this is not included in the Fink package.

Shuly Wintner provides a variety of binary versions with native Mac UI. Get the 2.12.0 version, to match the unison server on DICE - it appears to run fine under rosetta.

2006-03-16

Real Player for OSX Intel

Real Player Universal Binary is now available - build 412.

Note that this version is not mirrored on all download sites (the London UK site hosted by demon still has build 352, PPC only). I used one of the Seattle sites to get 412. You can check which build you have downloaded using get Info (command-I).

Once you've downloaded the correct build and put the put it into your applications folder, quit all web browsers; open the RealPlayer application, go through the setup process, which will install the plugin needed to access RealPlayer content on the web, such as BBC Radio Player.

You can then change Safari to run native — unless you want to view Shockwave content!

In the finder use get Info (command-I) then click "Open using Rosetta".

Since the RealPlayer plugin is compiled to PPC code you have to ensure Safar is run under Rosetta - an application running native Intel code cannot use a PPC plugin.

BBC Radio Player uses RealPlayer, so you need the same trick to run BBC Radio player on an Intel Mac.

2006-03-15

DivX for OSX 10.4 Intel

Since the DivX plugin is compiled to PPC code you have to ensure Quicktime or Safari run under Rosetta - in the finder use get Info (command-I) then click "Open using Rosetta". Update 2006:04:12 The plugin provided by the official release of DivX Player for Macintosh is a Universal binary. You can run it native. Curiosly, the DivX Converter and DivX Player are still PPC. Download the DivX 6 for Mac Installer.pkg
Double-click the installer to install the codec. Restart, and use Quicktime Player or Safari, to watch the latest day's work on the building (around 1.5Mb). You can also see the day at a slower pace (around 170Mb) or a directory of other views.

2005-12-26

ant javac Xlint:unchecked

You are porting your code to Java 5.0 (aka 1.5); building your project under Xcode gives the following notes from javac:

[javac] Note: Some input files use unchecked or unsafe operations.
[javac] Note: Recompile with -Xlint:unchecked for details.
This raises the following question:
Q: How do I pass -Xlint:unchecked to an ant javac task?
A: Edit the relevant target in your build.xml file to add an embedded compilerarg entry, to the javac task:
<compilerarg value="-Xlint:unchecked"/>
or
<compilerarg value="-Xlint"/>
so it reads something like this:
<target name="compile" description="Compile code">
       <mkdir dir="${bin}"/>
       <mkdir dir="${lib}"/>
       <javac srcdir="${src}" destdir="${bin}" 
              includeAntRuntime="no" 
              classpathref="lib.path" 
              debug="${compile.debug}">
           <compilerarg value="-Xlint"/>
       </javac>
</target>
Using "-Xlint" enables all recommended Xlint options, including :unchecked. See the Sun javac documentation (scroll down to Xlint) for details of other options, giving finer control if you need it.

2005-12-09

Installing the University Certificate

The EUCS site gives complex instructions for installing the University Certificate on MacOSX for use with Safari.

Now Apple have made this simple:

  1. Download the Edinburgh CA Certificate.
  2. Open (double-click) the certificate in the finder. This should launch Keychain Access and take you through a dialog to install the certificate.
  3. Install the Certificate in your X509 Anchors keychain.

2004-11-19

Broadcasting using iSight and Quicktime Broadcaster

NB this still seems flakey (ie it works sometimes but not reliably). Use at your own risk...

Preliminaries

These instructions assume you have an iSight camera, and have downloaded and installed Apple's QuickTime Broadcaster. Register to get an account on the University Darwin Streaming Server. You will be given FTP access to pilton.ucs.ed.ac.uk—the reflector which will braodcast your video stream.

Setting up a live broadcast

Plug in the iSight; quit from iChat; launch QuickTime Broadcaster.

Check the IP address for pilton.ucs.ed.ac.uk
(type host pilton.ucs.ed.ac.uk on the unix command line).

In the quicktime broadcaster window, select multicast transmission, and enter the reflector (i.e. pilton) IP 129.215.16.20 for both audio and video address. Don't change the port entries.

Under Audio, enable the audio stream and select the source (probably iSight) and set parameters; under Video enable the video stream, select source (iSight) and parameters. (Note that the University reflector is throttled at 350kbits/sec total for both streams, so 300kbits/sec is about the most you can use for video.)

Now choose File>>Export>>SDP... from the file menu. This produces an sdp file. Save it somewhere convenient (eg. as test.sdp) and then transfer it to the reflector (pilton.ucs.ed.ac.uk) by ftp.

You can save the Broadcast Settings at this point, quit QuickTime Broadcaster, and come back later to give your performance.

Launch Quicktime Broadcaster; Click the broadcast button to go on air, and tell your audience to watch the stream with QuickTime Player (File>>Open URL in New Player...) using a URL like rtsp://pilton.ucs.ed.ac.uk:554/hcs/test.sdp (see your email from ucs which gives details of the URL to your space on pilton). Unfortunately, both Safari and Firefox try and open this URL using Real Player - which doesn't cope with the format.

2004-05-04

sshLogin ssh-agent ssh-add

ssh-agent and ssh-add don't do what you want if run from terminal or xterm.

The excellent application sshLogin carries a GPL licence. This provides ssh-agent ssh-add functionality integrated with Apple's X11. You can even, in effect, install your ssh identity in your Apple keychain.

To install sshLogin:

You have to set up a keychain pair using ssh-keygen before using sshLogin.

2004-04-21

Setting environment variables

There is a special environment file which loginwindow reads each time a user logs in. The environment file is: ~/.MacOSX/environment.plist

Dot files aren't, by default, visible in the finder, so type cd; open .MacOSX in a terminal. If the environment.plist file is there you can open it in the Property List editor with a doubleClick. Otherwise, you will have to create the .MacOSX directory yourself.

To create the directory and file
$ cd
$ mkdir .MacOSX
$ echo "" > .MacOSX/environment.plist
$ open .MacOSX/environment.plist

This should open your new, empty environment.plist file in the Property List Editor. Select Root and Add a Child: the Key should be the name of the variable you want to set; Type should be String; Value should be the value you want to set for this variable. Next time you log in the variables should be set.

Environment variables set in environment.plist also appear in the standard bash environment. You can see all your environment variables using the shell command env from a Terminal window.

REFERENCE: http://developer.apple.com/qa/qa2001/qa1067.html

WARNING: do not set the DISPLAY variable—see my post re. X11 on Leopard.

2004-04-12

No xauth data

The common
Warning: No xauth data; using fake authentication data for X11 forwarding.
appears to be harmless. However, it is annoying. It arises when you have no xauth data!

The command
xauth list
displays all your xauth data. If there is no entry for your local display — which looks something like
localhost/unix:0 MIT-MAGIC-COOKIE-1 026666083d4e480d3e77544949281b49
you can generate one using the command
xauth generate :0 .

This creates an authorization using the MIT-MAGIC-COOKIE-1 protocol. Clients that connect with this authorization will be untrusted.
The period "." is part of the command; "untrusted" is probably what you want.
However, for some operations you need to connect as a trusted client. In case of problems, try using the command
xauth generate :0 . trusted
see man xauth or the X11 Security Extension Specification.

2004-04-01

Printing to DICE printers

You have to be connected inside the DICE firewall (eg. by physical connection, informatics wireless, or ssh) to use the printers ...

On a DICE machine, use the Unix command printers -s to list the available printers, + information on models, printservers, and location. (See man printers for other options.)

Use the Printer Setup Utility (in /Applications/Utilities/ on the Mac) to add a new printer:

IP Printing
Printer type: LPD/LPR
Printer Address: printbp.inf.ed.ac.uk
Queue Name: lwa
Printer Model HP LaserJet 4050 Series

Printer Type
is LPD/LPR
Printer Address
is the address of the server
Queue Name
is the name of the printer
Printer Model
can be left as Generic. However, if you get it right you can access printer-specific options from the OSX print dialogs.

2004-02-02

EUCS VPN and wireless

To use the central 802.11 wireless network (available in,: Raeburn Room, Old College; Hodgson Room, Science & Engineering College Office; Concourse, Appleton Tower, inter alia) and the University VPN, register online with the University Computing Service (EUCS) .

You do not need to download the Cisco VPN client. Once registered, you can connect to the University VPN server, vpngate.net.ed.ac.uk using PPTP with the built-in VPN client (accessible via Internet Connect on MacOSX v10.3 (Panther)).

Once connected via the VPN you can use the staffmail SMTP server: staffmail.inf.ed.ac.uk

2003-01-01

feedback

Please give feedback on this blog by leaving a comment below.

Was the tip you found unclear?
Were you looking for something else?

Let me know!

Thank You

This is a post to say, "thank you" to you, the reader, for your interest, feedback, comments and tips.

If you found this blog helpful, please just click the link at the foot of the post.

For constructive feedback or criticism, add a comment on the relevant post (or for general feedback, on this post).

To submit a tip, mail it to mpfourman-mactip@blogspot.com.